RainMaker Generic issues
Why doesn't Claiming work with our deployment?
Answer
Here are the primary reasons why claiming is not available:
- Self-claiming requires a separate authentication service with information of secret keys programmed in the efuse of all ESP32-S2s during chip manufacturing. Replicating the service in private instances isn't straightforward.
- Host driven or assisted claiming gives admin rights to the user claiming the node, which is undesirable in commercial deployments.
In the private instance, instead of claiming (which happens in the field), the credentials will be pre-flashed on the modules and the public certificates will be registered with the cloud backend service using the RainMaker Admin CLI. There are multiple options for generating and flashing the credentials.
- Buy pre-provisioned modules from Espressif and register the certificates' file with the admin CLI.
- Use the admin CLI to generate the unique binaries and register the certificates. Flash the binaries on the modules one by one using esptool or multiple at once using a programmer jig.
Please get in touch with your Espressif Sales contact for more information on this.
Where do I find the Client Id and callback URLs for Third-party Integrations and Phone apps?
Answer
Callback URLs are required for third-party login. Client Id and callback URLs are required for phone app configuration and third-party login.
If you have not configured Cognito callback URLs, please configure with the steps given here: Configure Cognito callback URL
For third-party login for Android app, please check : Getting redirect URI for Android app
For third-party login for iOS app, please check : Getting redirect URI for iOS app
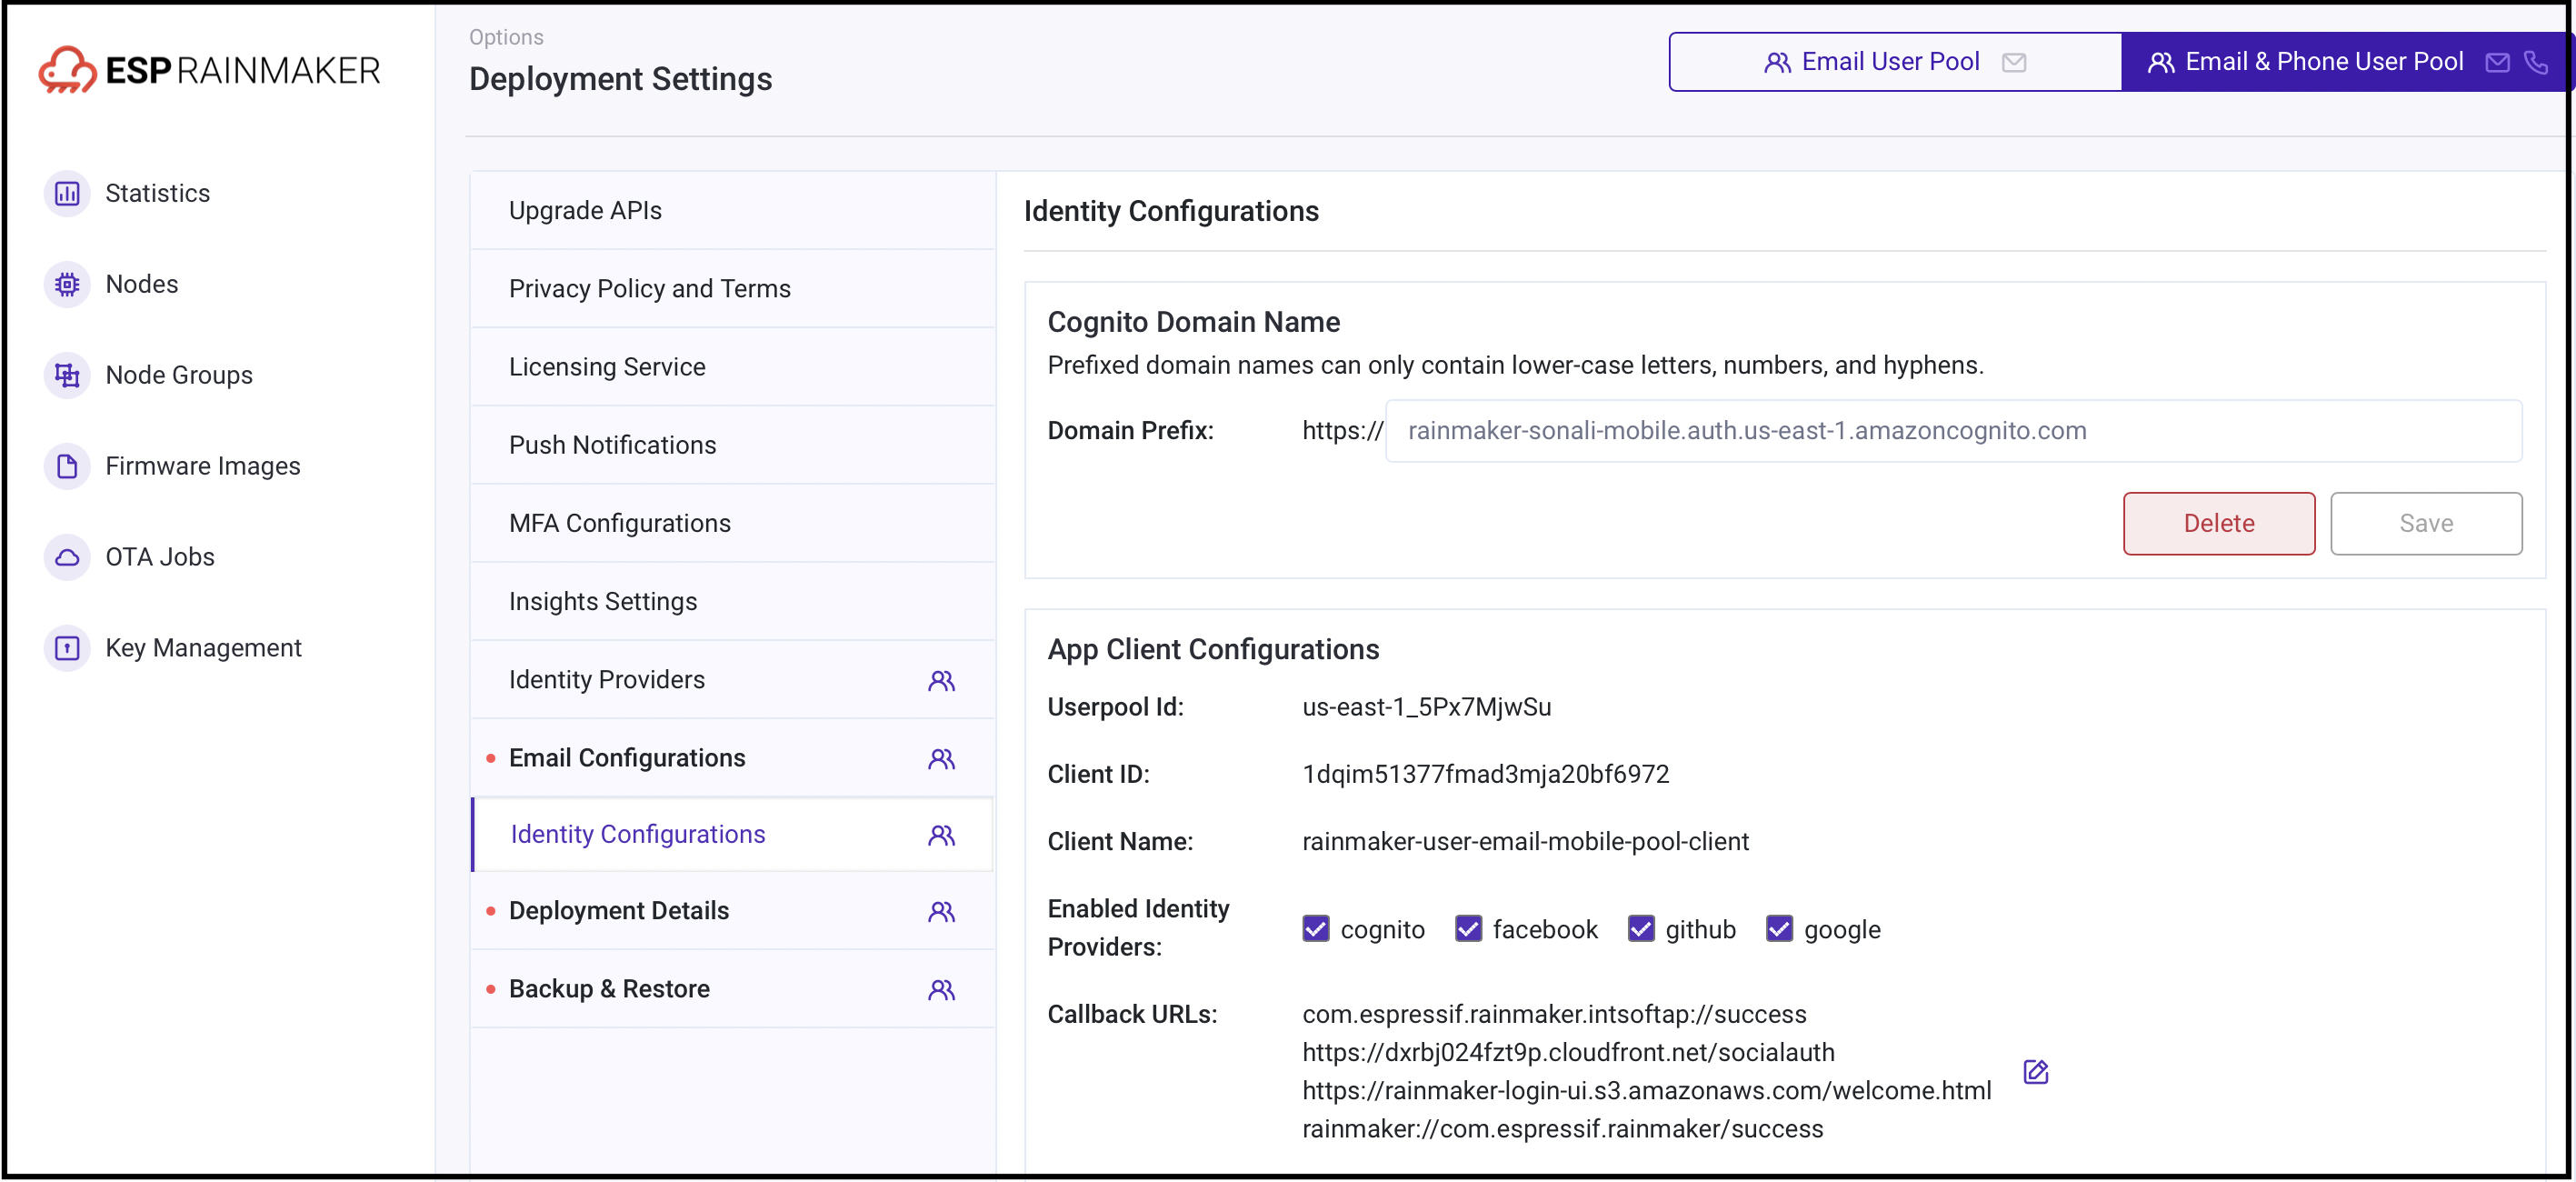
The callback URLs for each app client can be found on RainMaker Dashboard. The steps to find callback URLs are as follows:
-
Login to RainMaker dashboard with the super-admin credential.
-
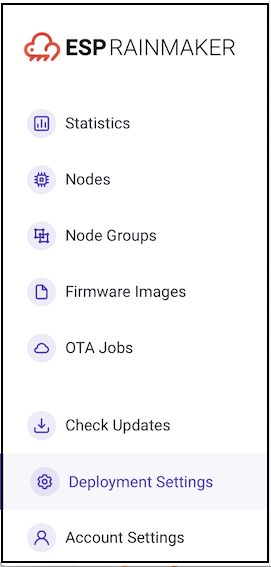
From the left hand side menu, select "Deployment Settings".
- Go to the "Identity Configurations" tab.

- The client Id and callback URLs configured for each app client will be listed in the "Cognito App Client Configurations" section.
Standard RainMaker
Check client with name rainmaker-user-email-mobile-pool-client
OAuth only RainMaker:
Check client with name rainmaker-client
Where do I find the Client ID and Callback URLs for Alexa and GVA?
If you have not configured Cognito callback URLs, please configure with the steps given here: Configure Cognito callback URL
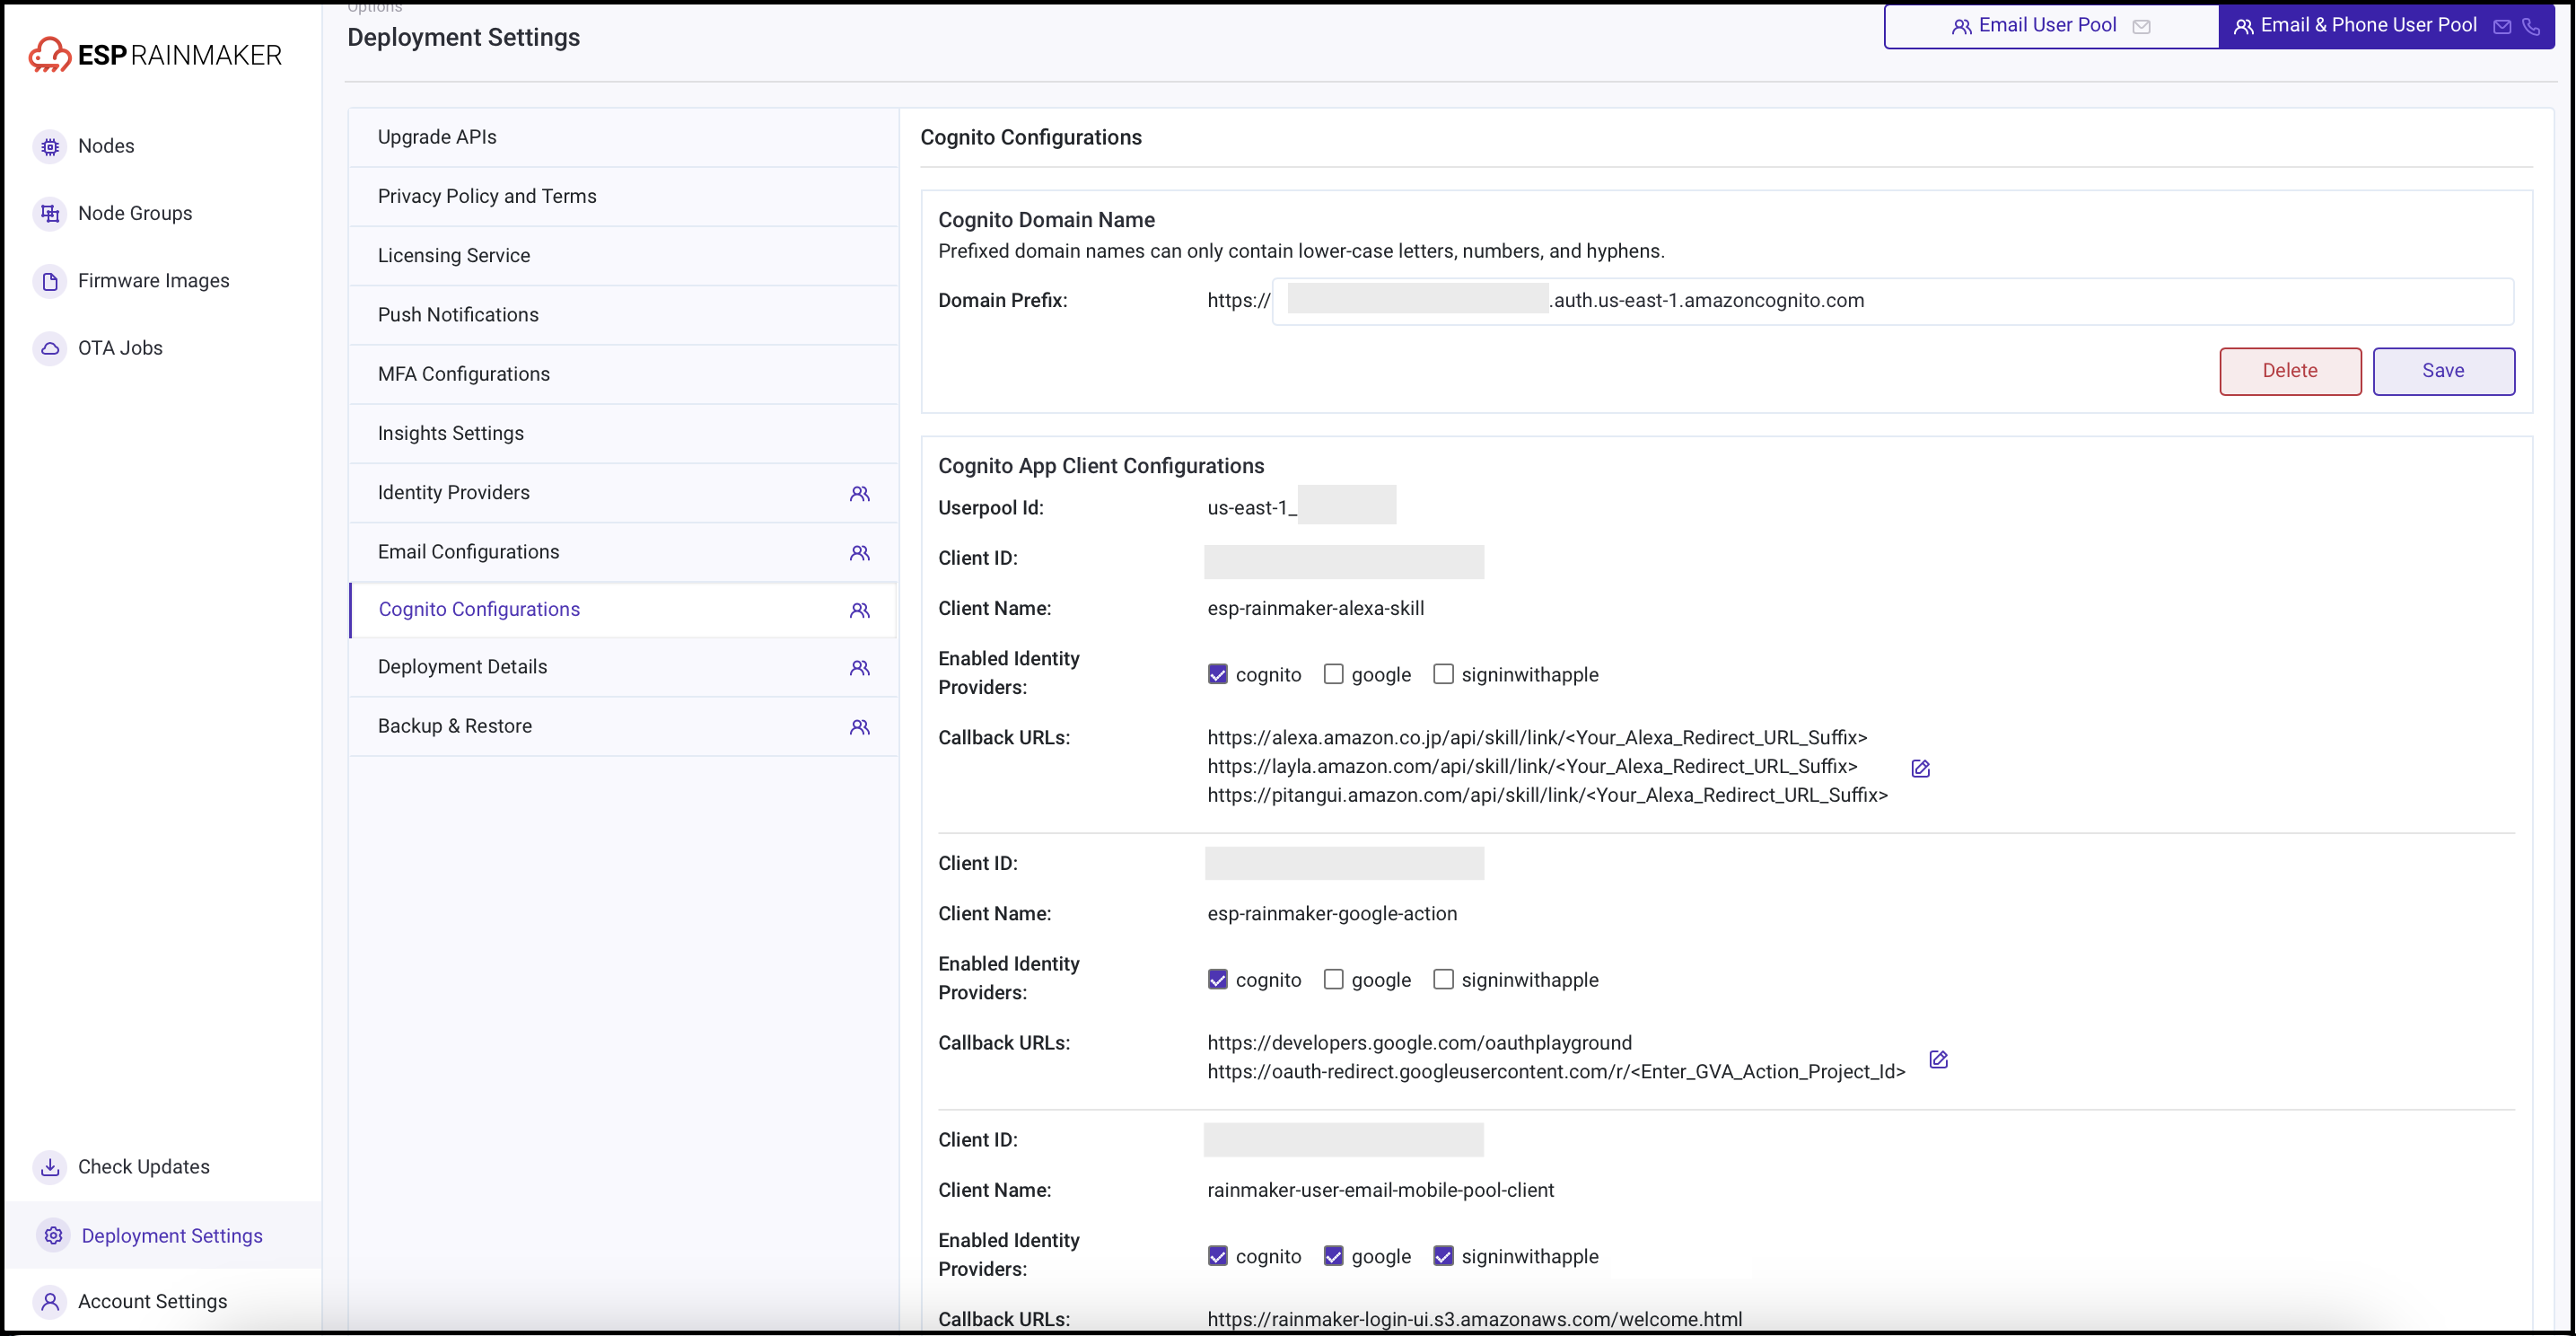
-
Login to RainMaker dashboard with the super-admin credentials.
-
From the left hand side menu, select "Deployment Settings".
- Go to the "Identity Configurations" tab.
- Note down the Client ID for clients with names
esp-rainmaker-alexa-skillandesp-rainmaker-google-action.
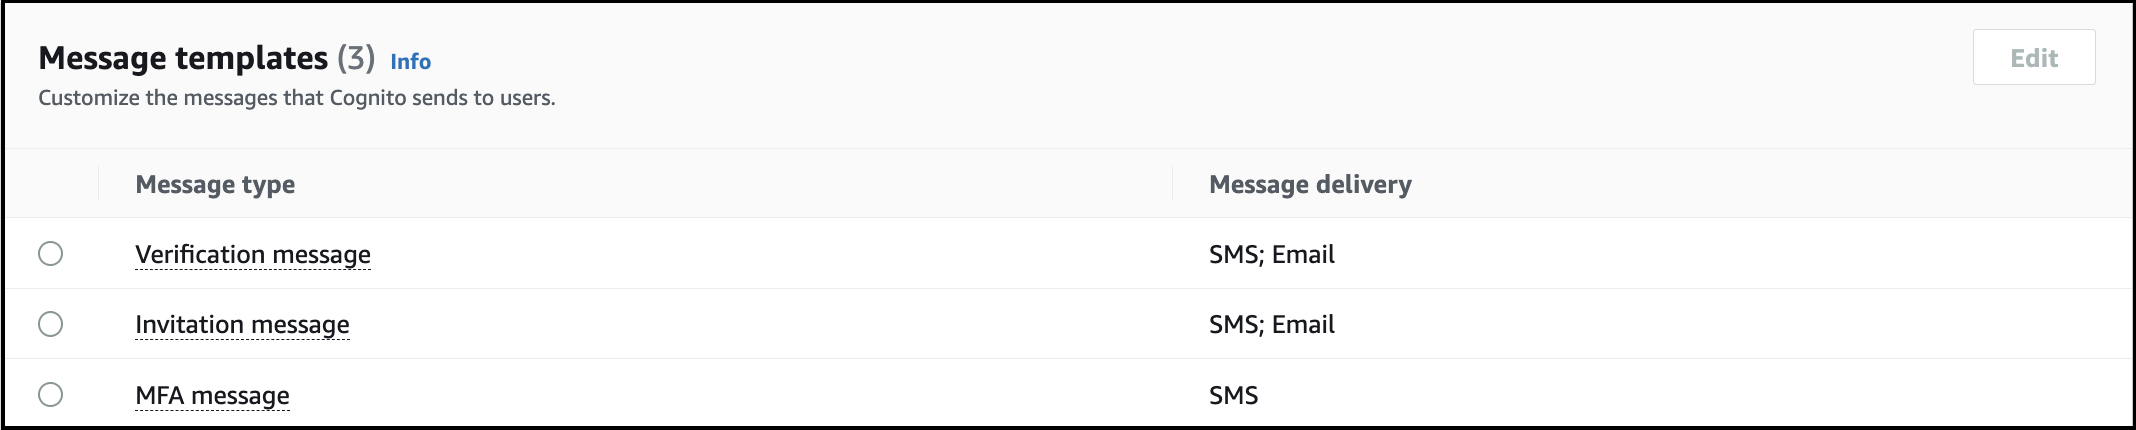
Where do I find the custom message template in Cognito?
Answer
The configured custom message template can be found on AWS Cognito Console. The steps to find custom message template are as follow:
-
Login to AWS console.
-
From the AWS console, search for Cognito Service ( AWS Console -> Service -> Cognito).
- Click on manage user pools.
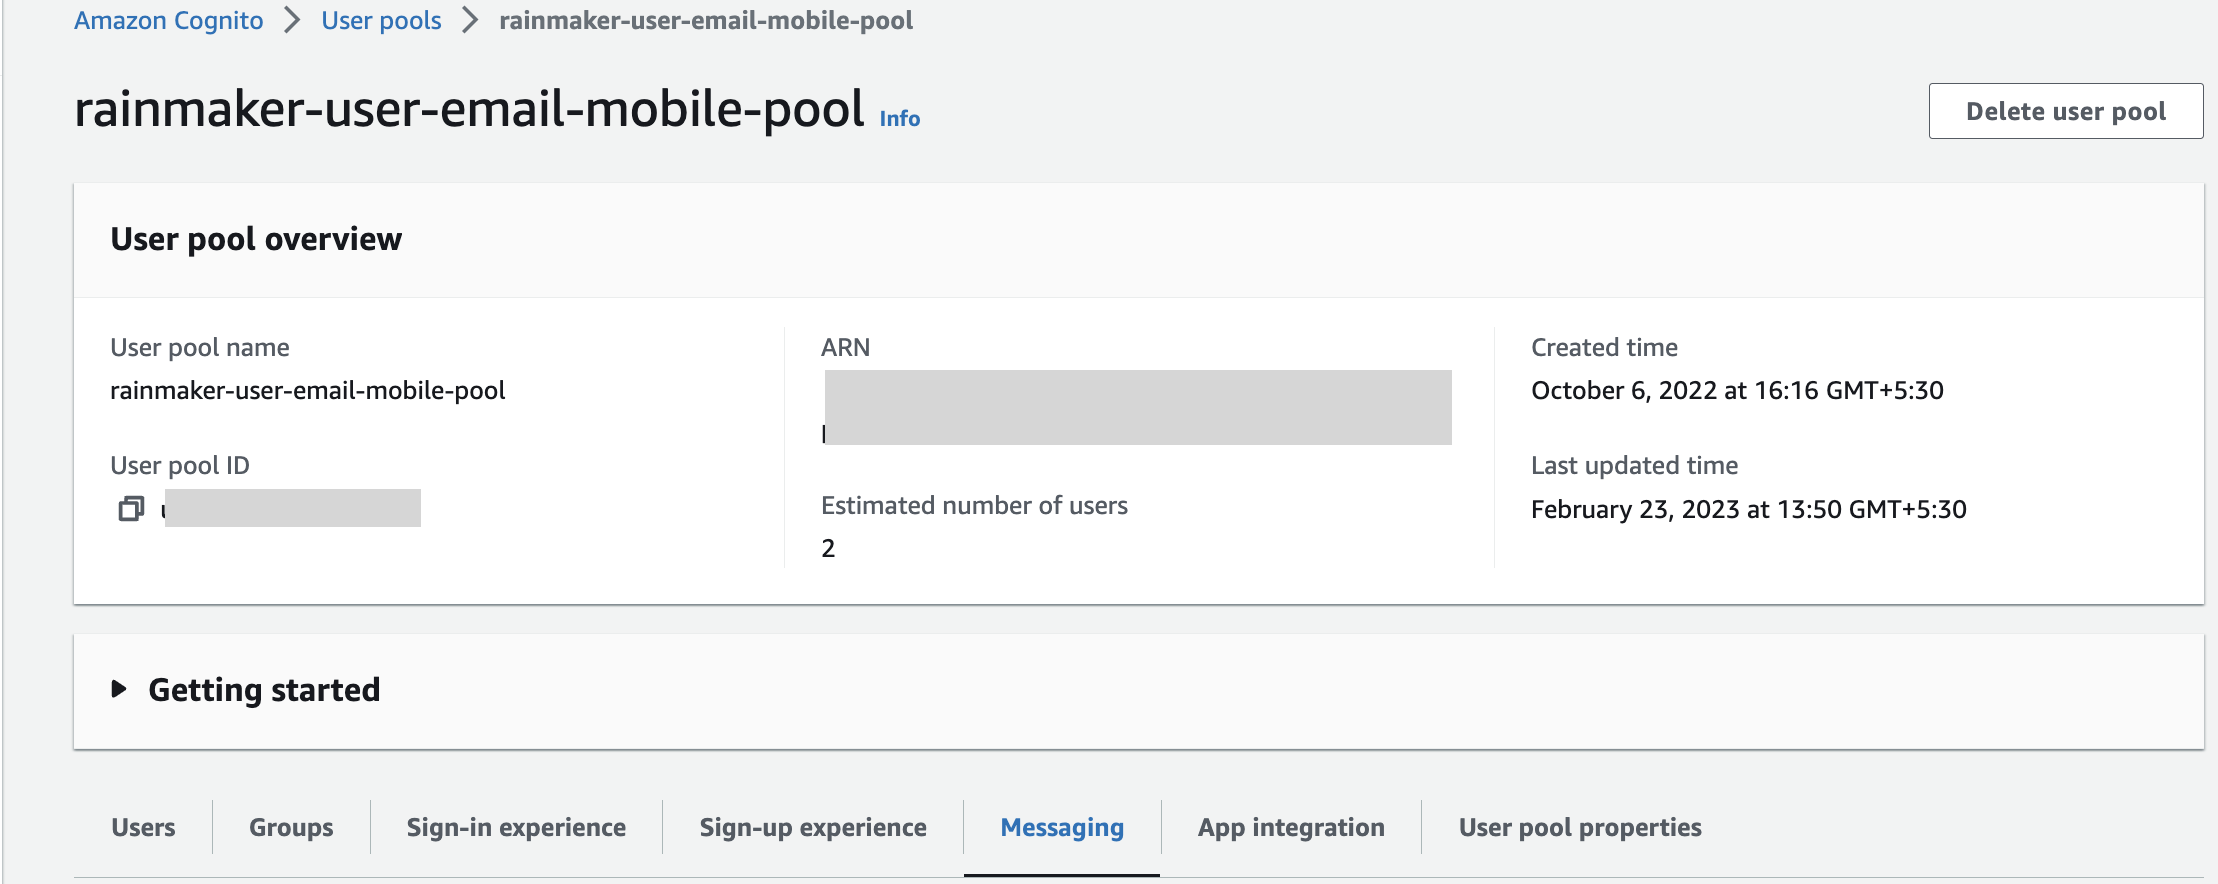
- Search for rainmaker-user-email-mobile-pool and click on it.

- Click on Messaging option & scroll down to Message templates .
- The details about the configured custom message, like SES region, FROM email address ARN, Email subject, Email message can be found on the Message Customization page.
When I am trying to link my Amazon Alexa account with my RainMaker account from the RainMaker Mobile app, why do I need to login again using the hosted UI?
Answer
For the account linking process, we need to get the RainMaker Auth code from AWS Cognito.
To get the Auth code, there is a need to login again using Hosted UI.
During Alexa account linking if I unlink the account and want to link the skill with a different account, the hosted UI is logged into using the cached browser data. How do I link with a different account?
Answer
In order to log into a different account on the hosted UI you can do the following:
For iOS:
- Go to iPhone Settings
- Go to Safari
- Go to Advanced
- Go to Website Data
- Search for the domain name of the OAuth URL (e.g. auth.rainmaker.espressif.com)
- Swipe right and then press delete
For Android:
-
Go to Chrome browser app (the browser app which you are using)
-
Click on option menu (icon with 3 dots)
-
Go to History
-
Click on "Clear browsing data"
-
Click on "Clear data"
After clearing browsing data, the next time you go through the account linking flow the login screen for the hosted UI will show up and you can log into the other account.
I haven't yet started using Rainmaker, But I'm still receiving emails from AWS saying your AWS free tier limit exhausted for certain services like SQS, What should I do?
RainMaker uses AWS SQS queues and lambdas to process the messages in the queue. Lambda periodically checks for new messages in the queue. As the customer is not using the system so there is no message in the queue. Here, the lambda polling receives an empty message which is billed as ReceiveMessage requests that don’t return a message. These empty receives are charged per Amazon SQS pricing even if messages aren’t sent or received from your SQS queue.
These empty read counts will naturally decrease as the customer starts using the Rainmaker.
AWS refer link: https://aws.amazon.com/premiumsupport/knowledge-center/sqs-high-charges/
The RainMaker support team from Espressif has requested read-only access to the AWS console; How do I create an IAM user with read-only access to all resources?
Answer AWS Identity and Access Management (IAM) is a powerful tool for securely managing access to AWS services and resources. To set up an IAM user, follow these steps:
- Login to AWS Console and type "IAM" in the search box.
- In the IAM dashboard on the left side of the screen, navigate to the Users section and click the "Add User" button.
- Here, provide a user name and select the "AWS Management Console access" checkbox as the user needs to access the AWS Management Console. Then, click the "Next: Permissions" button.
- On the Permissions page, choose "Attach existing policies directly" and type "ReadOnlyAccess" to filter the available policies. Locate the "ReadOnlyAccess" policy and enable the checkbox next to it. Proceed by clicking the "Next: Tags" button.
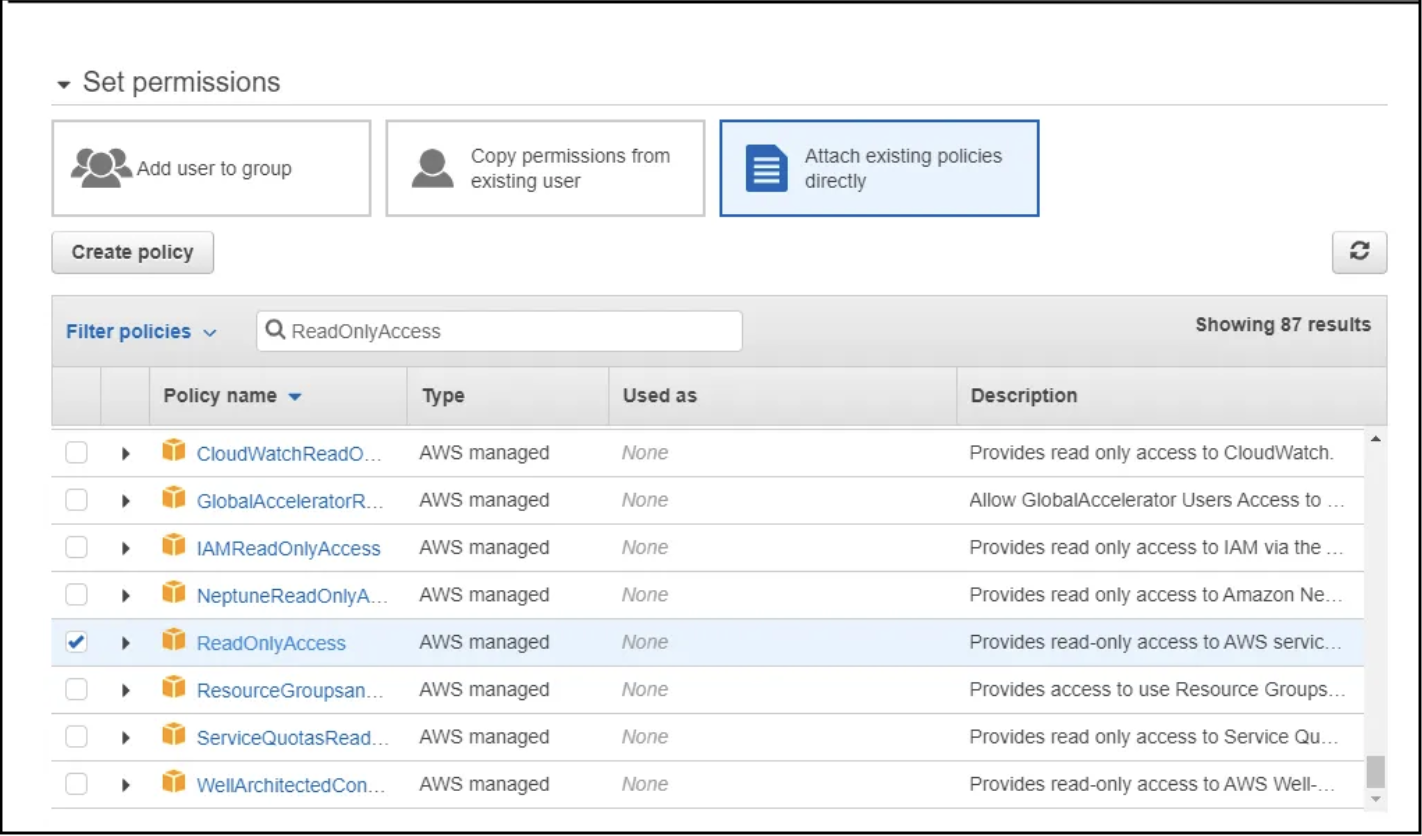
- You can skip the Tags page by moving forward to the "Next: Review" button.
- Review the details for the read-only account user, ensuring they meet your requirements, and then click the "Create User" button.
- Once the user is created, you will have access to their credentials. Click the "Download .CSV" button to obtain the necessary information and make sure to securely store the password. Keep in mind that the Secret Access Key and Password cannot be recovered if lost. You would need to reset the account in such a scenario.
- Finally, share the user's credentials along with the URL provided under "Users with AWS Management Console access can sign-in at" link.
How to change the RainMaker Superadmin mail id?
Answer
It is not recommended to use personal mail ID for the Superadmin user, Please use a generic mail ID instead. Access to this generic email should be limited to very few set of people as this user will be the most privileged user in RainMaker deployment.
e.g. service@<company_domain_name>
To change the RainMaker Superadmin mail, you need to use the change_super_admin swagger API via postman.
-
In Postman, login to Rainmaker using current Superadmin credentials.
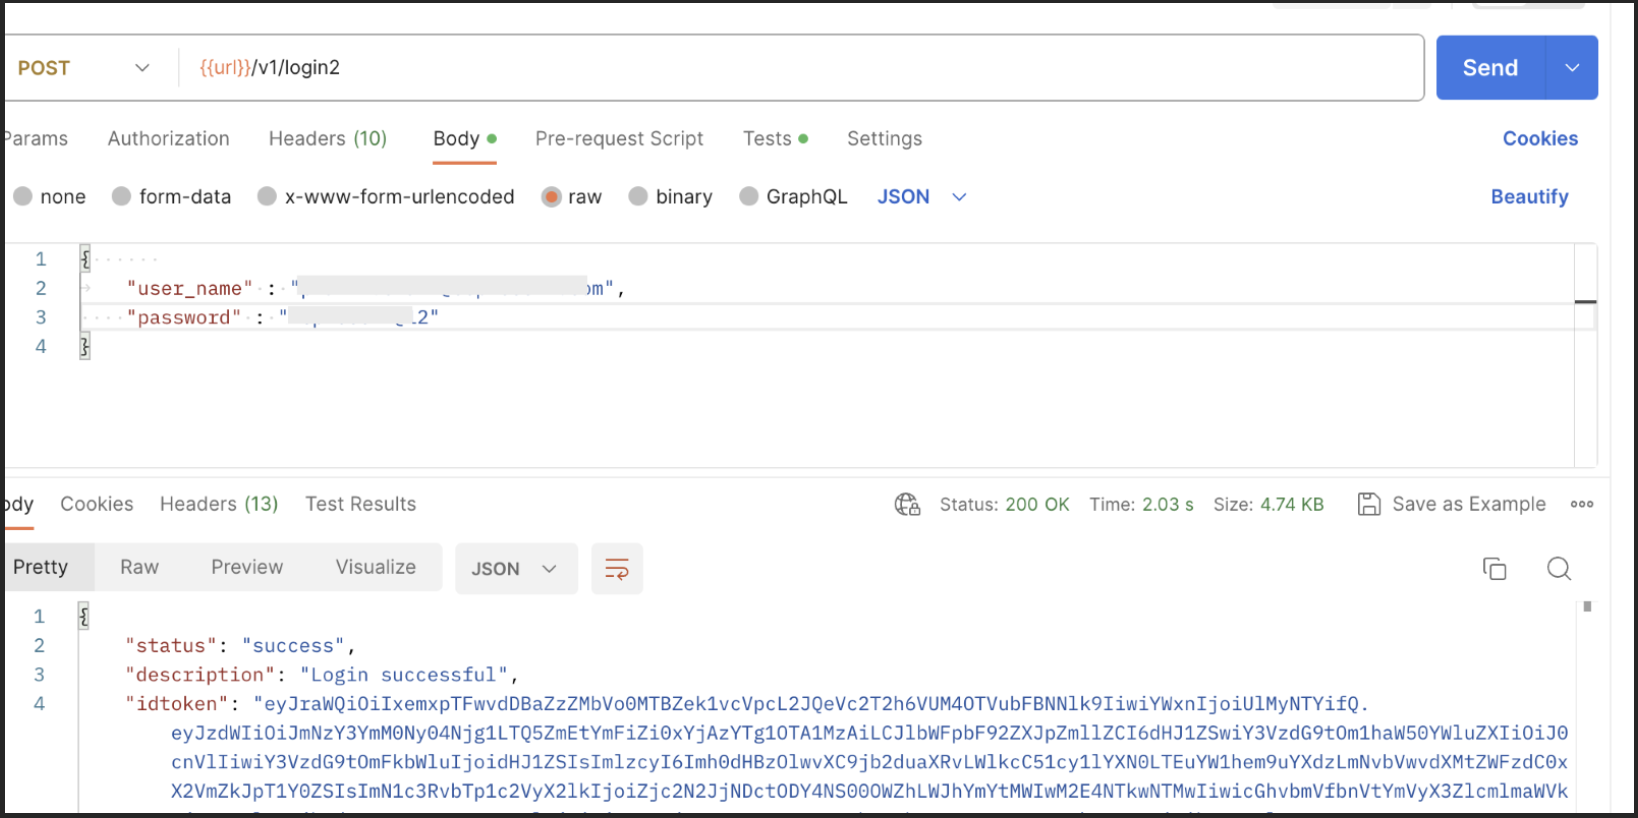
-
In Postman, create new API request
PUT - {{url}}/v1/admin/change_super_admin
Header -
Key Value Authorization {{access_token}} Body -
{
"new_super_admin": "user@domain.com"
}
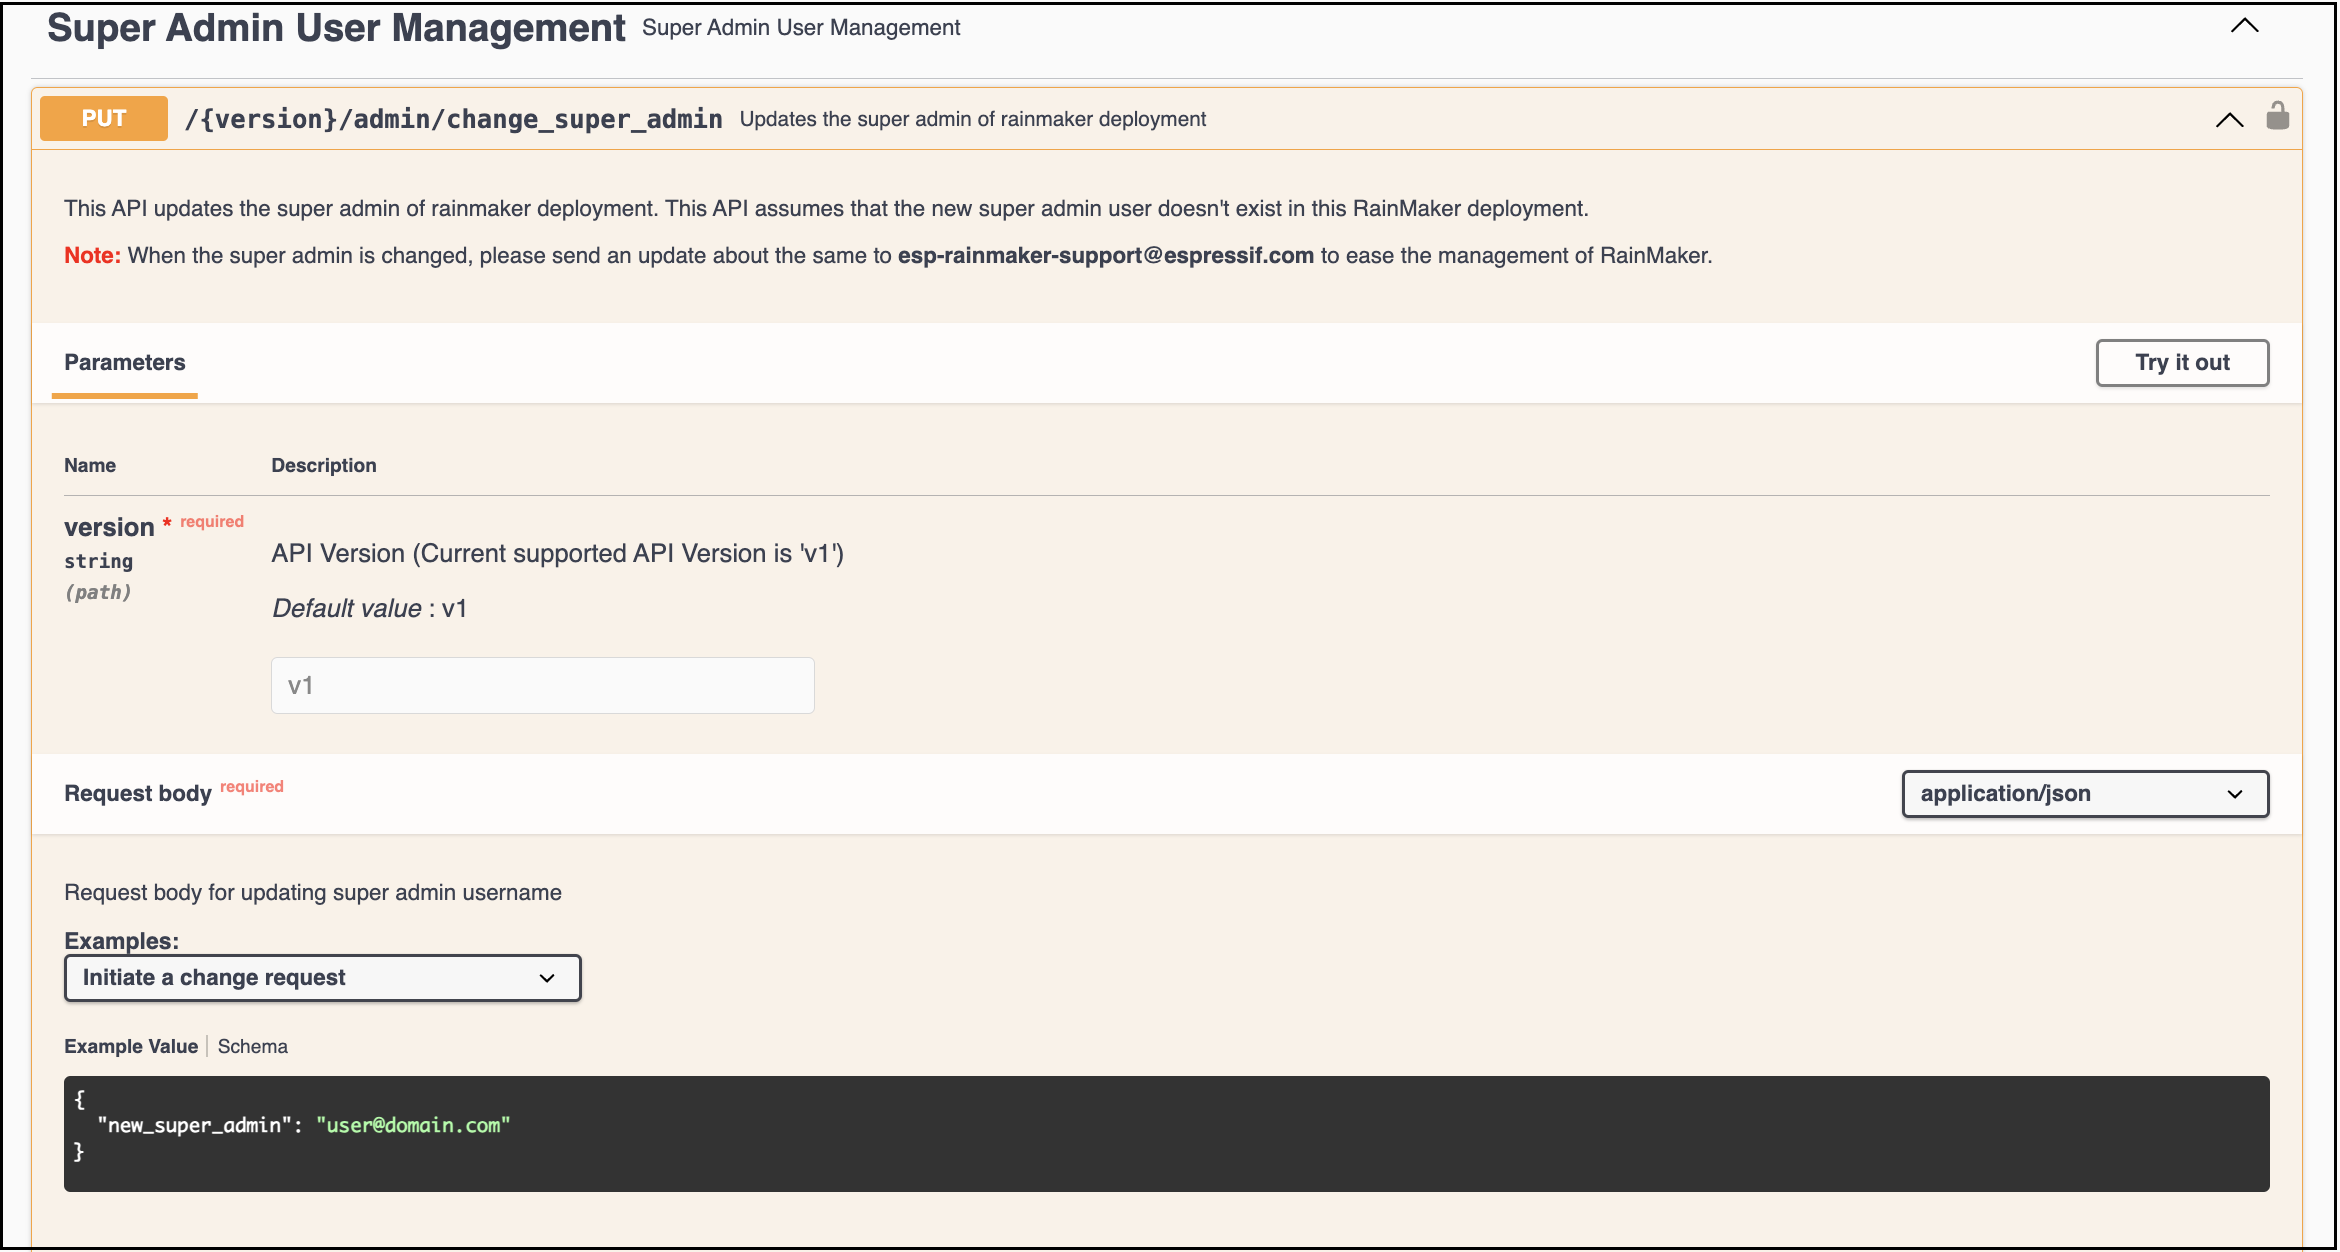
-
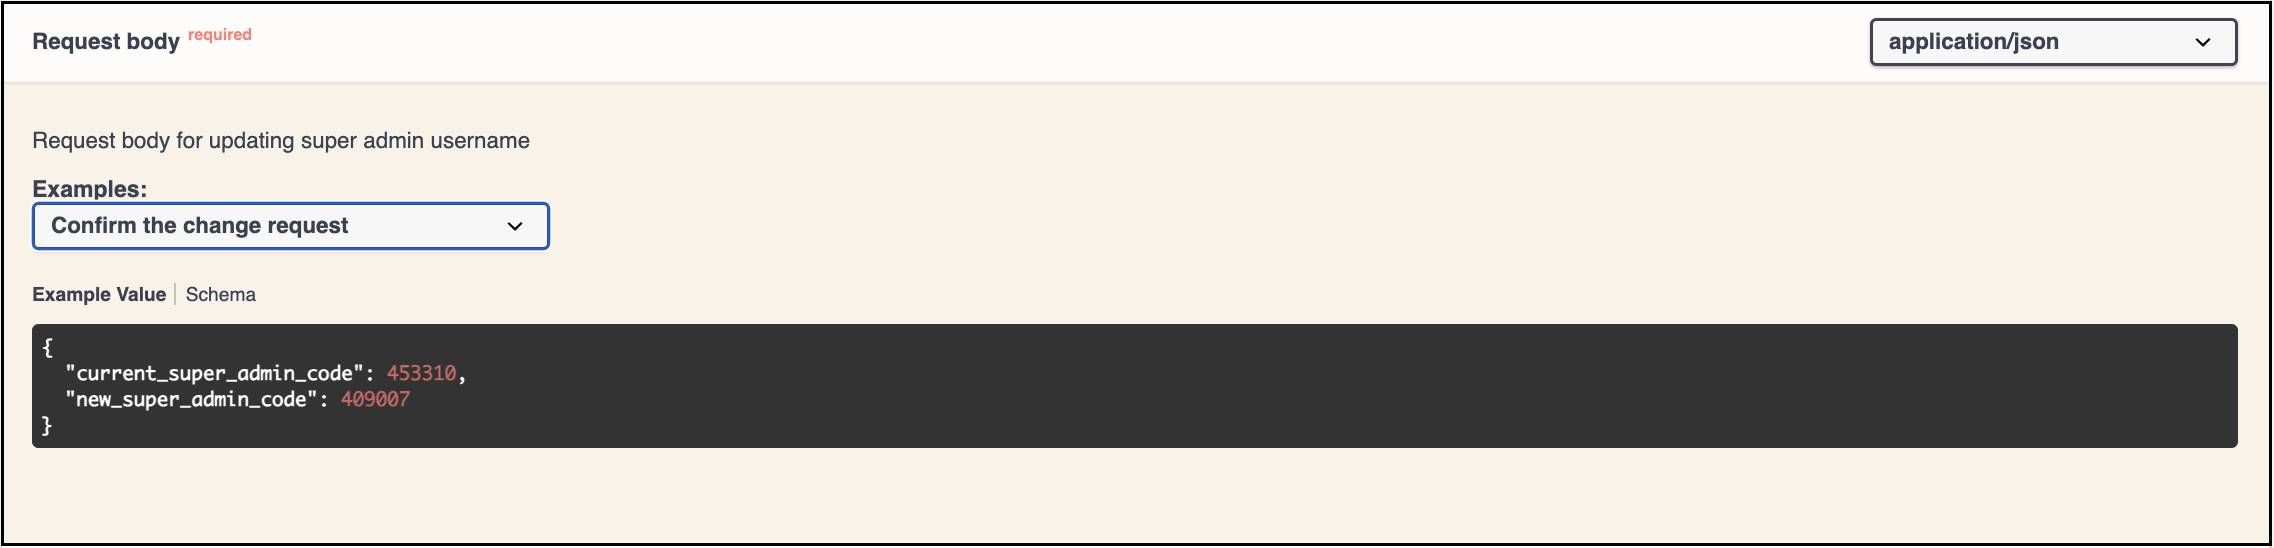
Upon initiating the Superadmin email address change request, both the current Superadmin and the new Superadmin will receive a verification code via email. It is necessary to enter and confirm the codes to proceed with the change request.
Using the same API we can confirm the change request.
How to check if a CloudWatch log group exists?
Answer
- Go to your AWS console and search for CloudWatch
- Go to the Amazon CloudWatch service -> Log groups
- Enter the log group name to be searched for

- The log group will show up if it exists
How to create a CloudWatch log group?
Answer
- Go to your AWS console and search for CloudWatch
- Go to the Amazon CloudWatch service -> Log groups
- Click on 'Create log group'

- Done
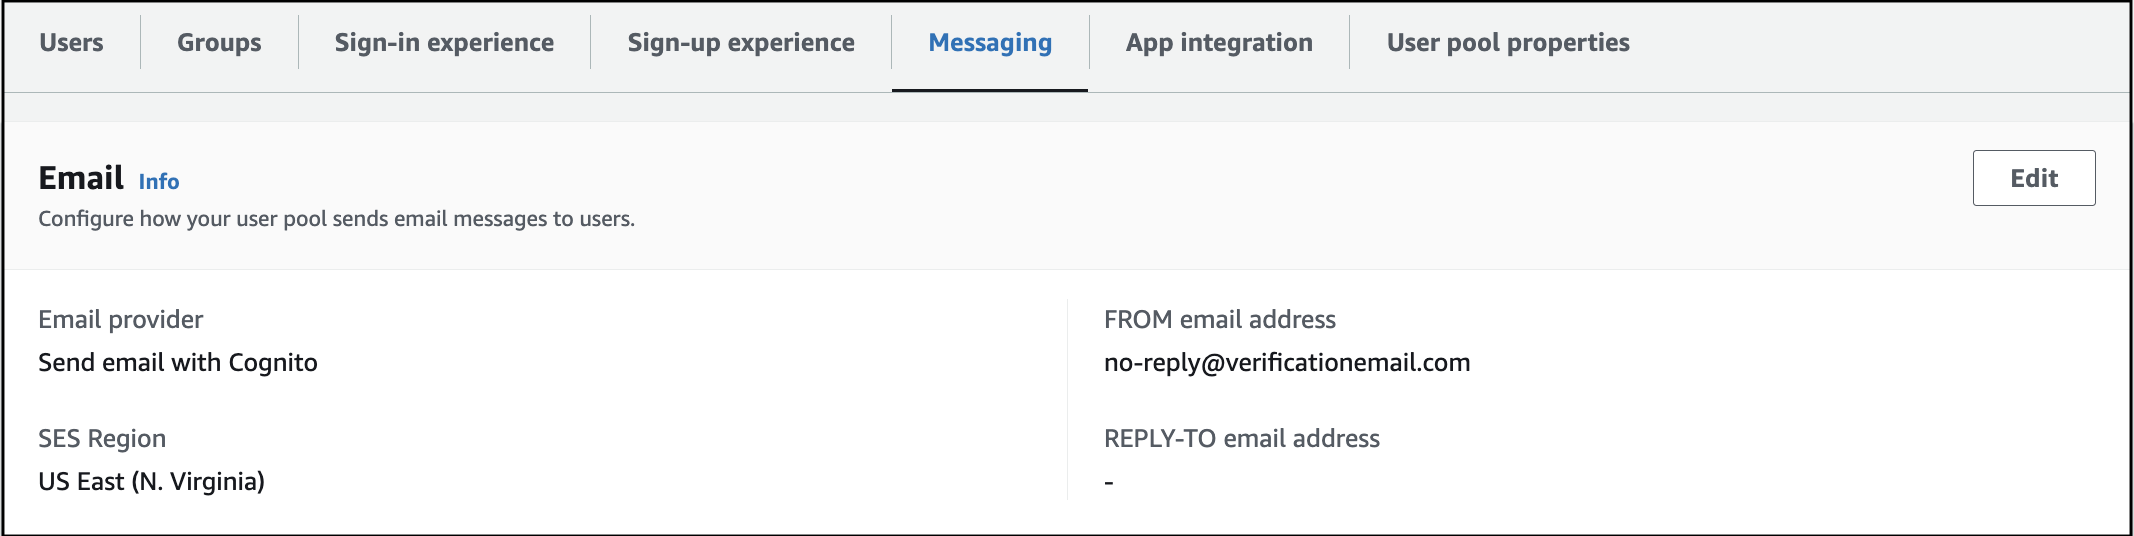
End-users receiving emails from no-reply@verificationemail.com despite configuring the verified SES mail ID. How can this issue be resolved?
Here are the steps to correctly configure the SES email provider for your Cognito user pool:
-
Navigate to Amazon Cognito. Select your user pool, specifically the rainmaker-user-email-mobile-pool. Click on Messaging in the menu list.

-
Configure the Email Provider: Check the Email provider section to view the current settings and the email address used to send emails. It is recommended to use the Send email with Amazon SES option as your email provider.
-
Configure SES Email Address: Ensure that you select an email address from the verified list in Amazon SES. Once selected, click Save Changes.
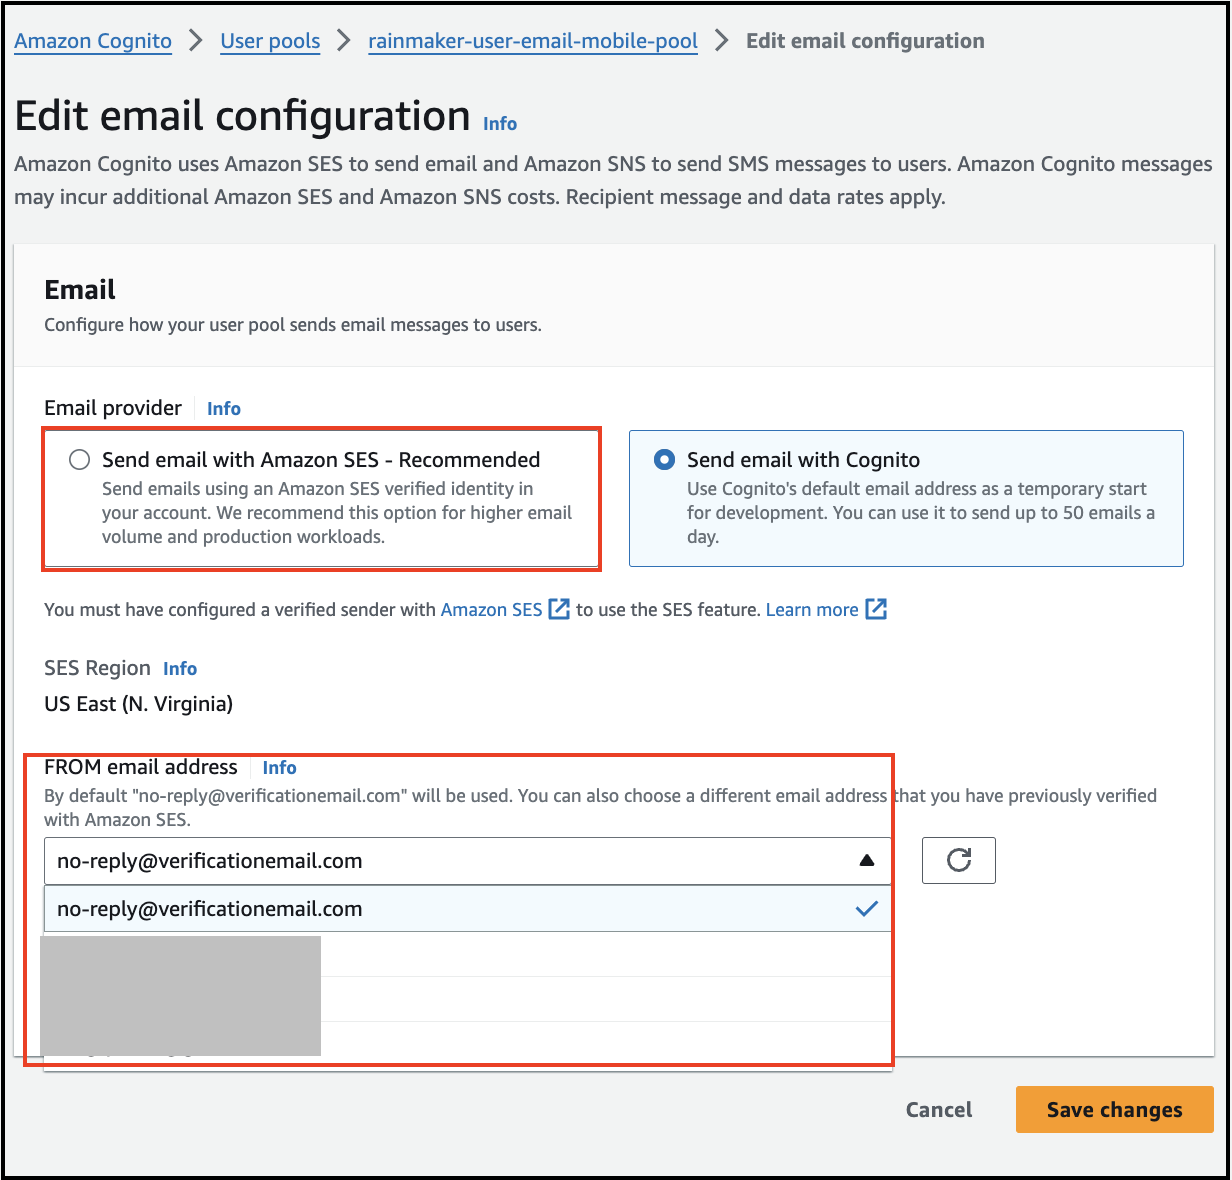
By following these steps, emails should be sent from the specified SES email address instead of the default no-reply@verificationemail.com.
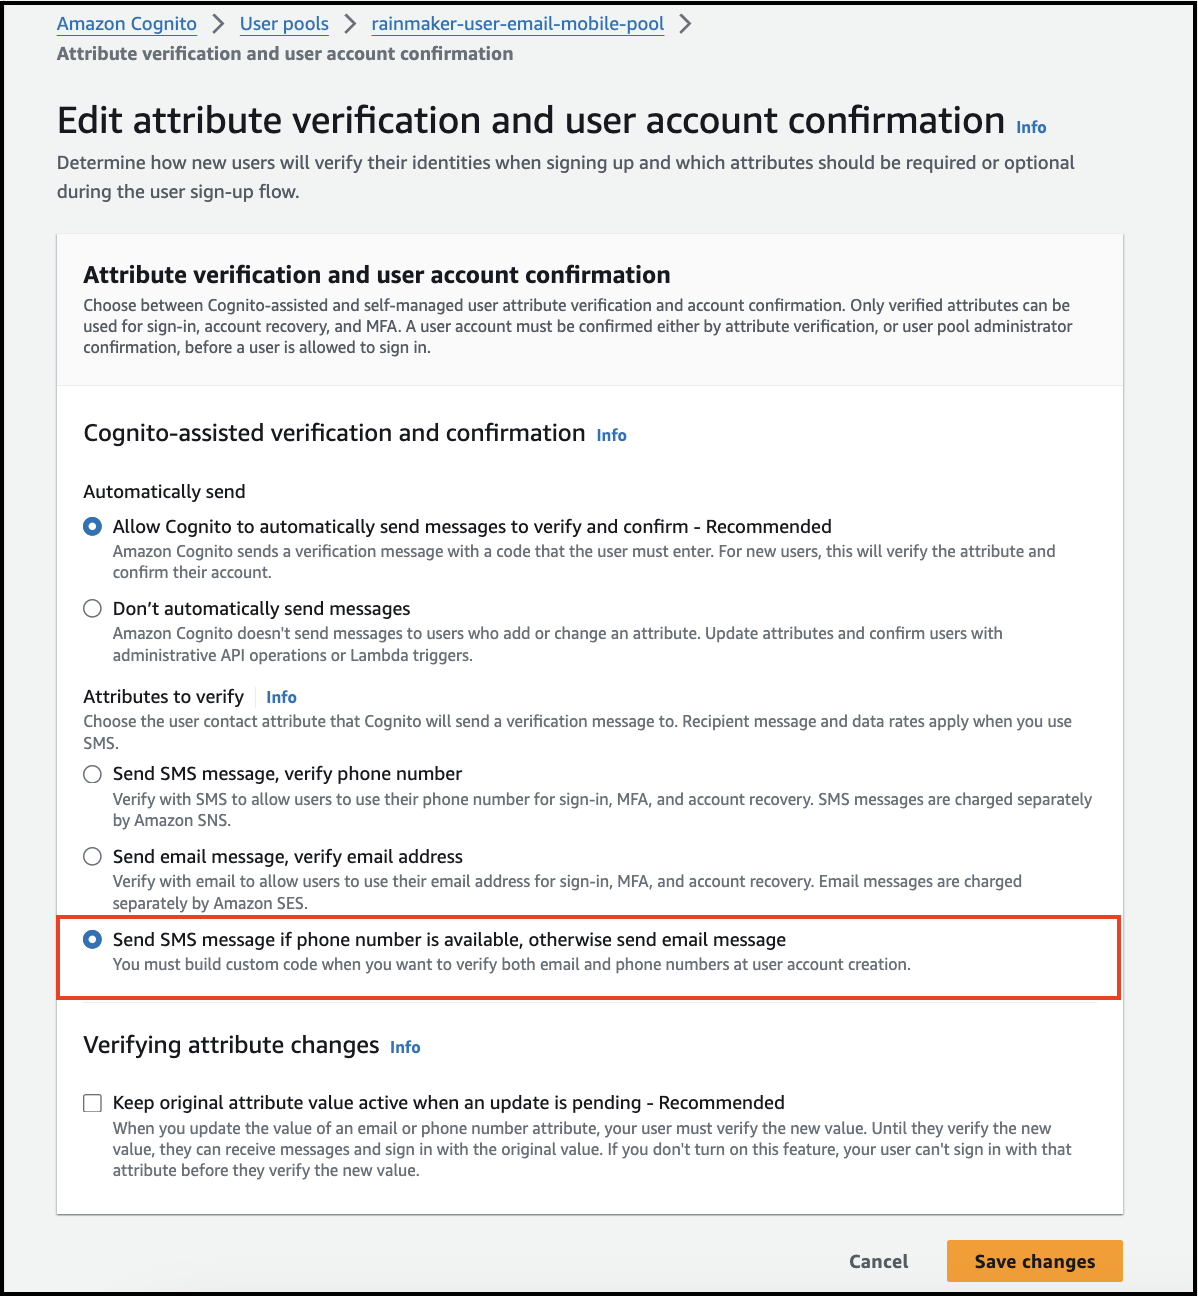
End-users not receiving signup/login OTP on phone after the rainmaker upgrade. How can this issue be resolved?
You need to verify the below setting if your end-users are signed up with the mobile numbers.
-
Navigate to Amazon Cognito. Select your user pool, specifically the rainmaker-user-email-mobile-pool. Click on Sign-up experience in the menu list.
-
Ensure that the following setting is properly configured:
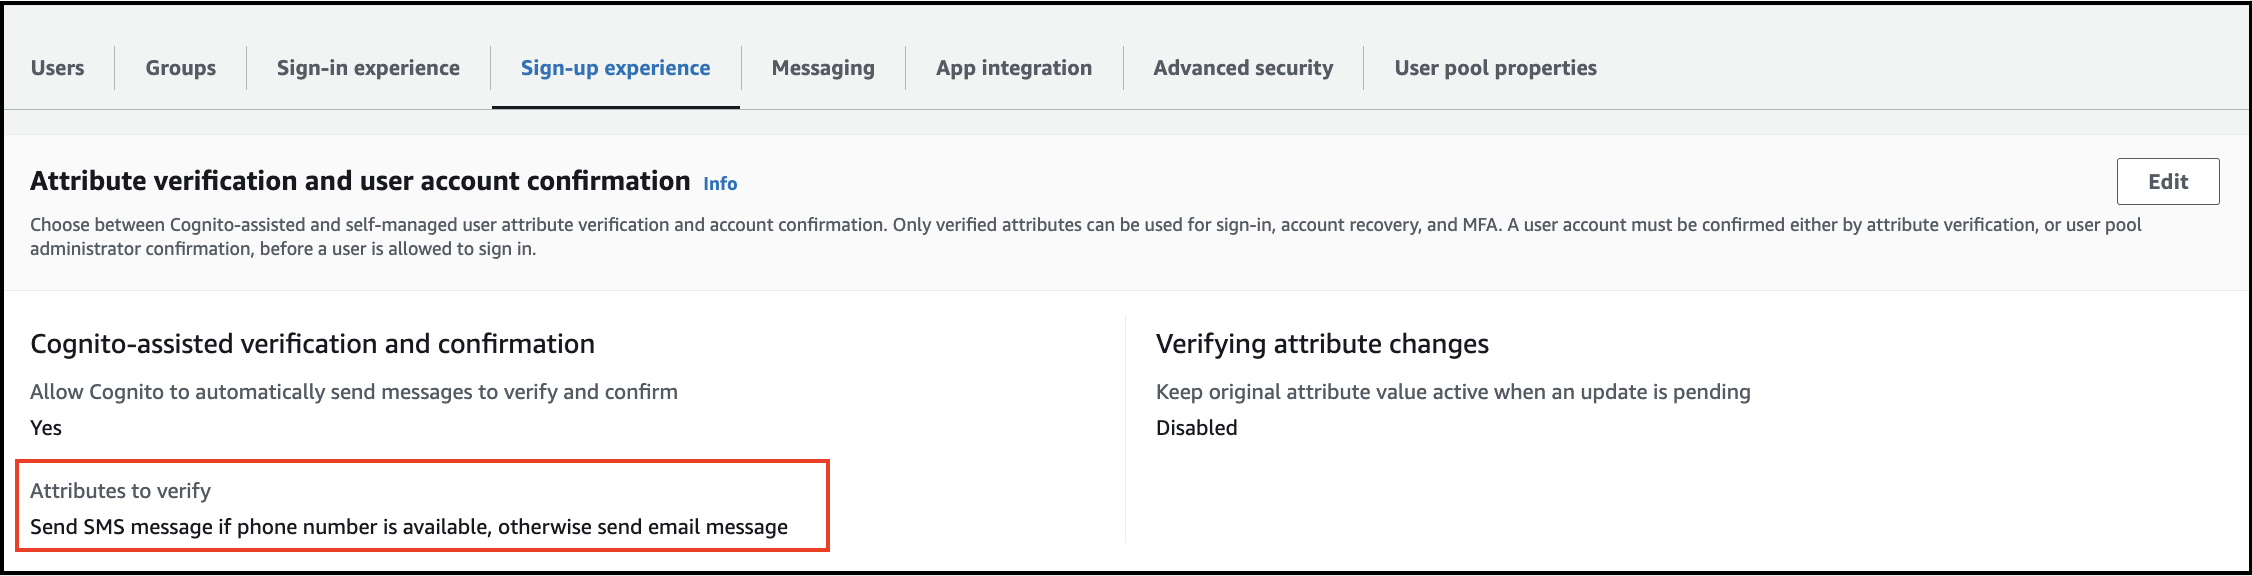
-
Verify the "Send SMS message if phone number is available, otherwise send email message" attribute under the messaging settings.
-
If the setting is different, update it to this configuration.
-
Click Save Changes to apply the update.
If the configured Push Notification templates (e.g. Title and Message Body) have reset, how can this issue be resolved?
Follow these steps to configure your custom push notification templates:
- Open the RainMaker Dashboard
- Navigate to the Push Notifications Section in the Deployment Settings section
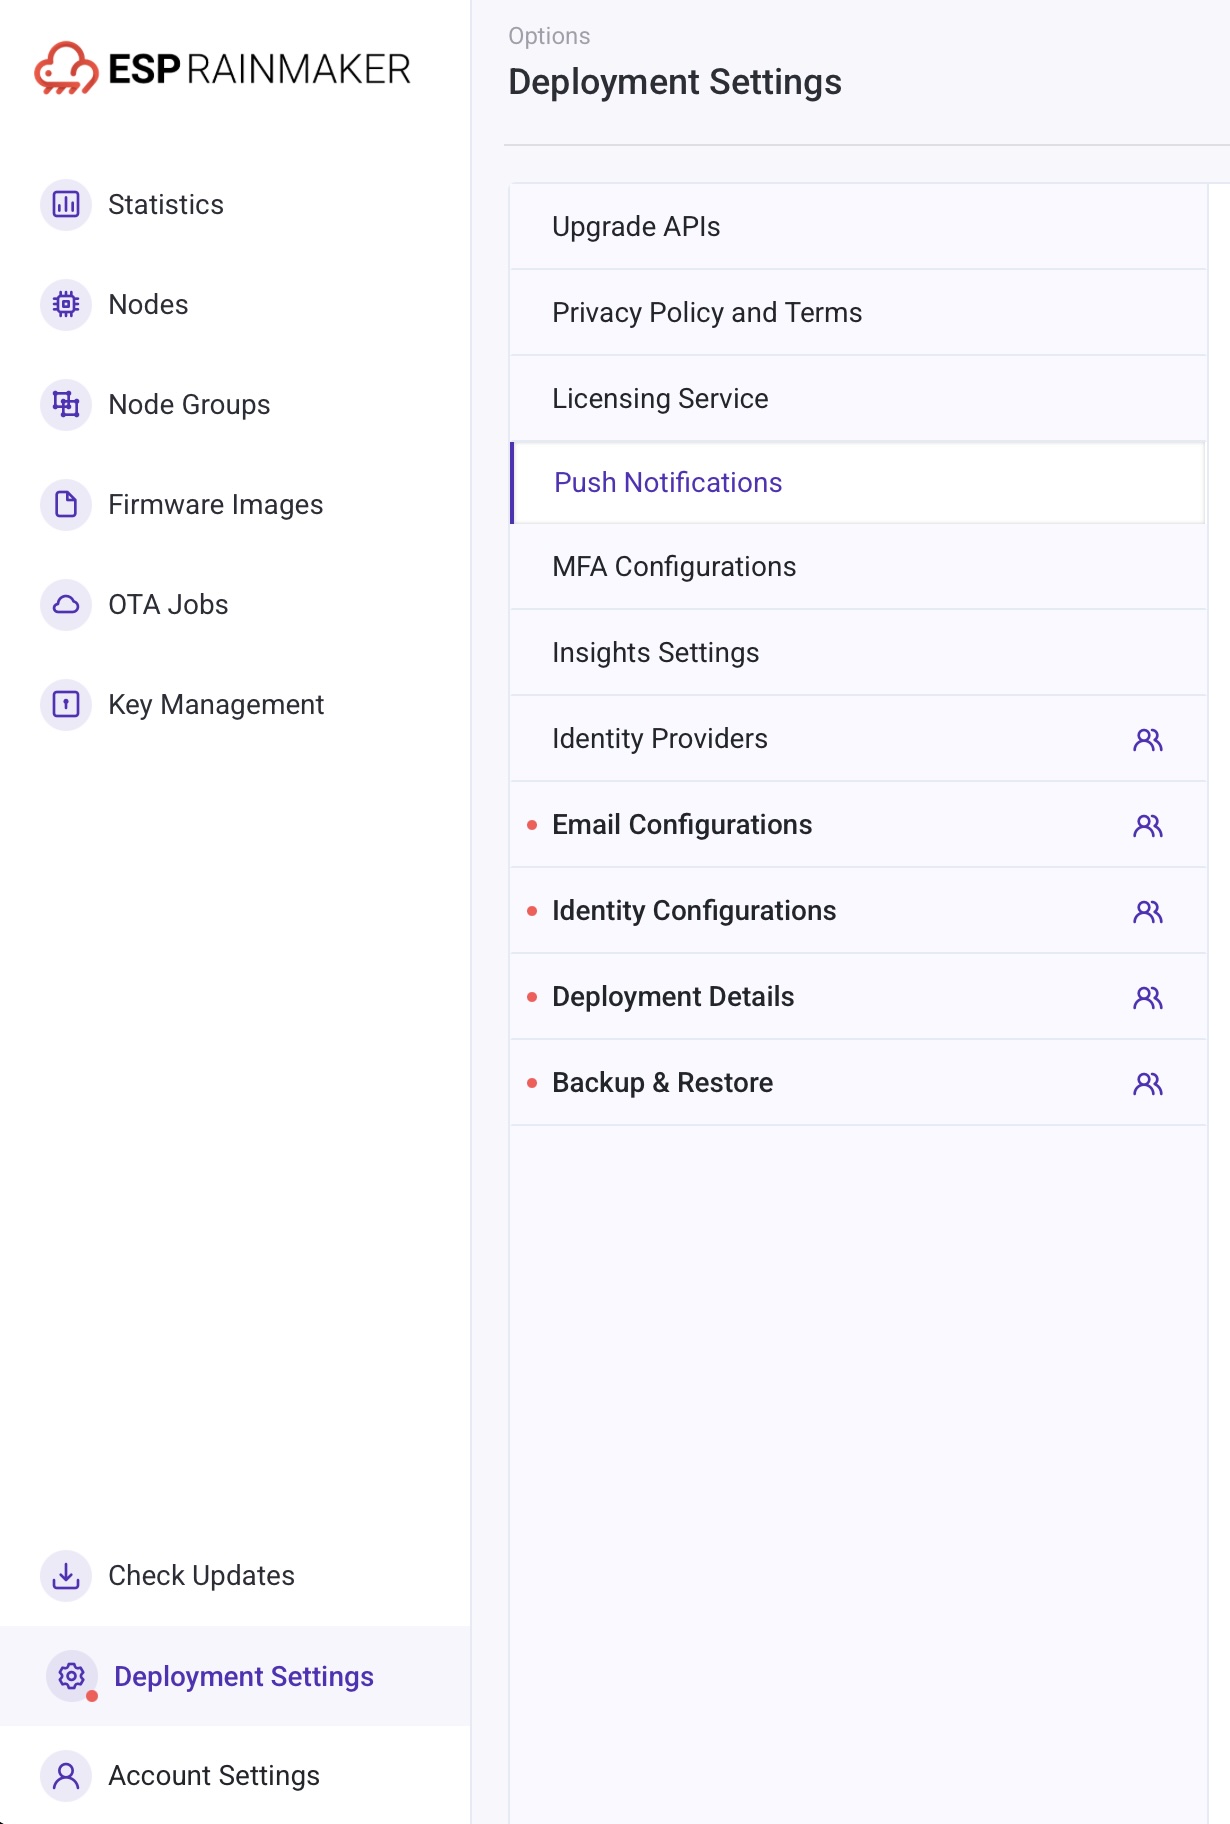
- If the common message template has been reset, Re-configure the Common message title accordingly and save your changes -
Click the “Update Push Notification Template” button to apply your new settings.

- Similarly for other template type, Select the Template to Reconfigure – Identify the specific template type that has reset (e.g. Group shared with User).
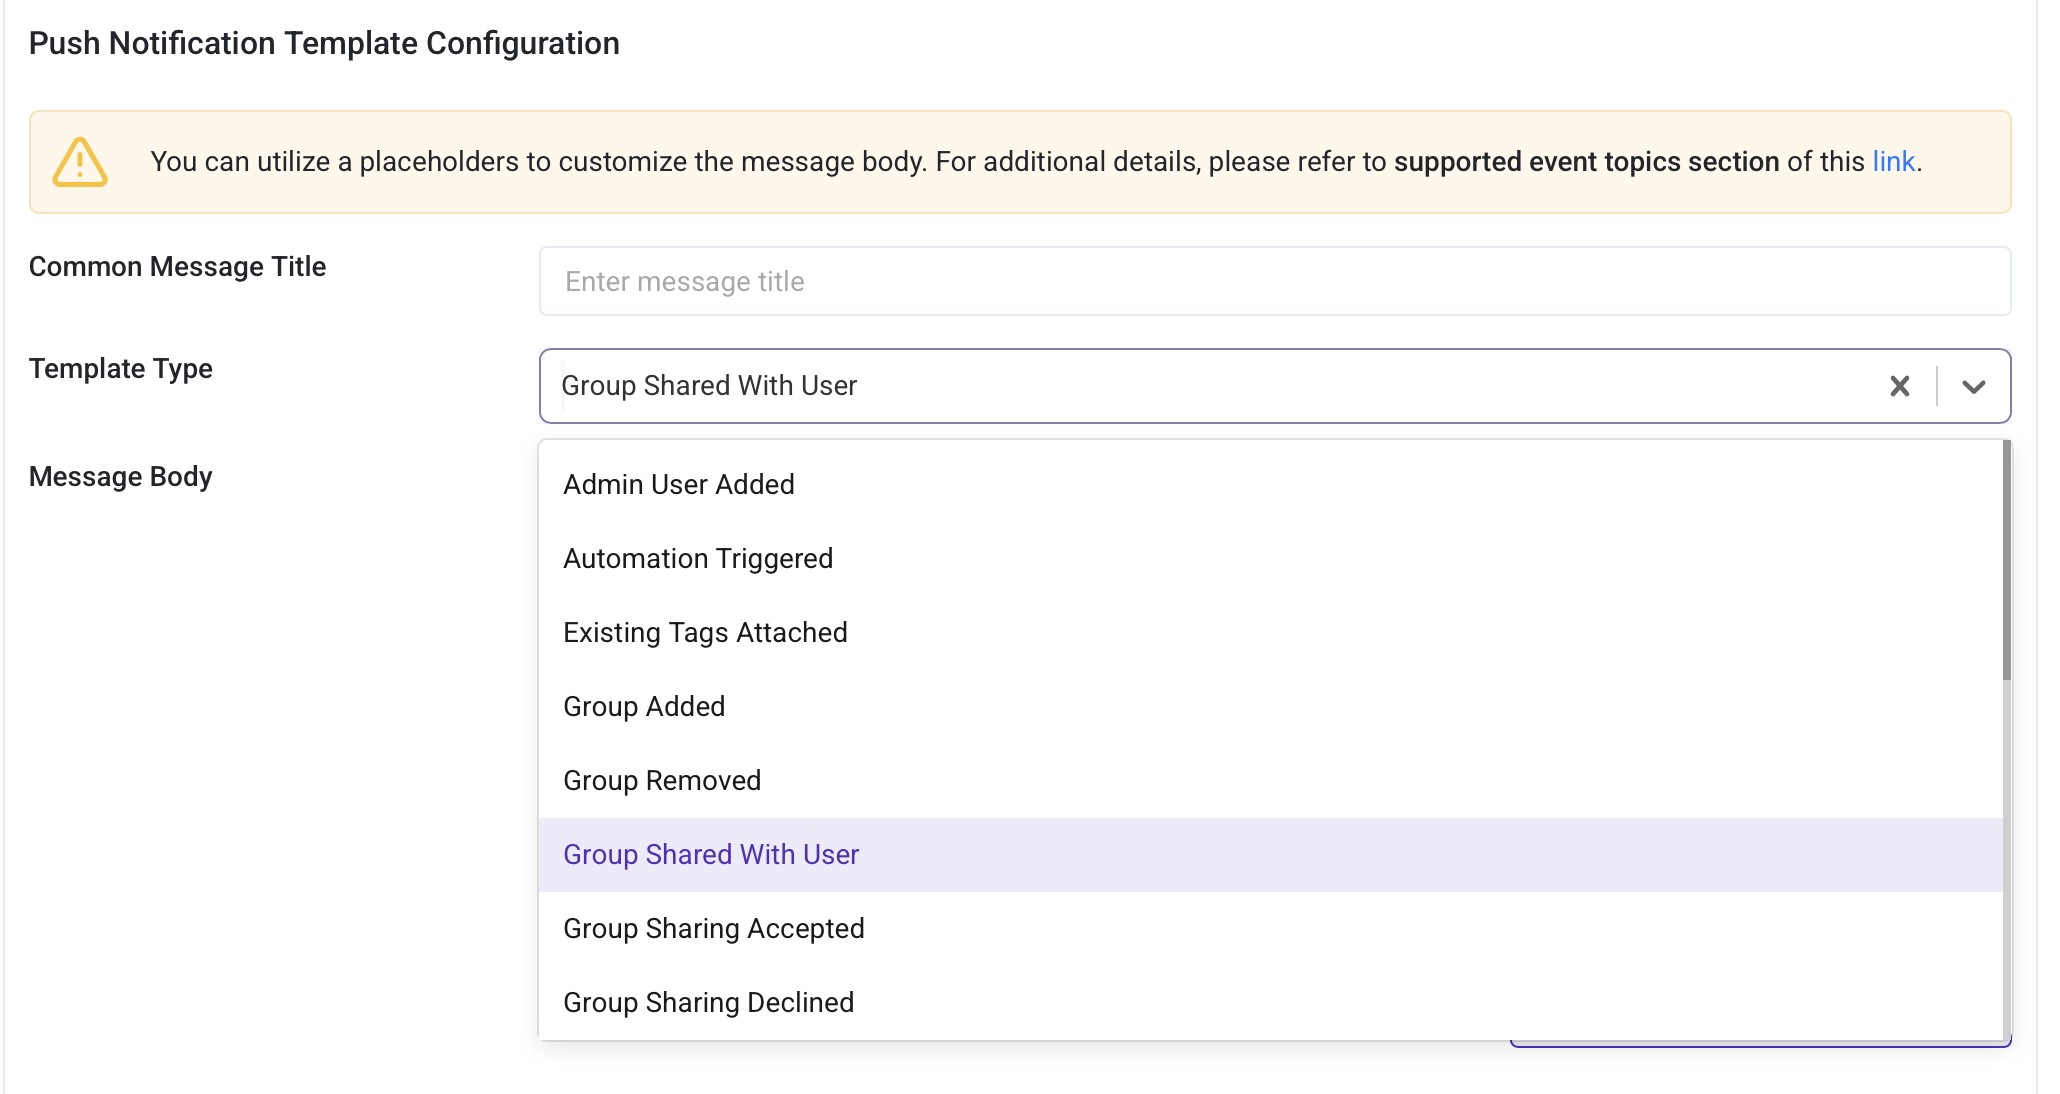
- Update the Template Fields – Re-enter your desired Title and Message Body in the respective fields.
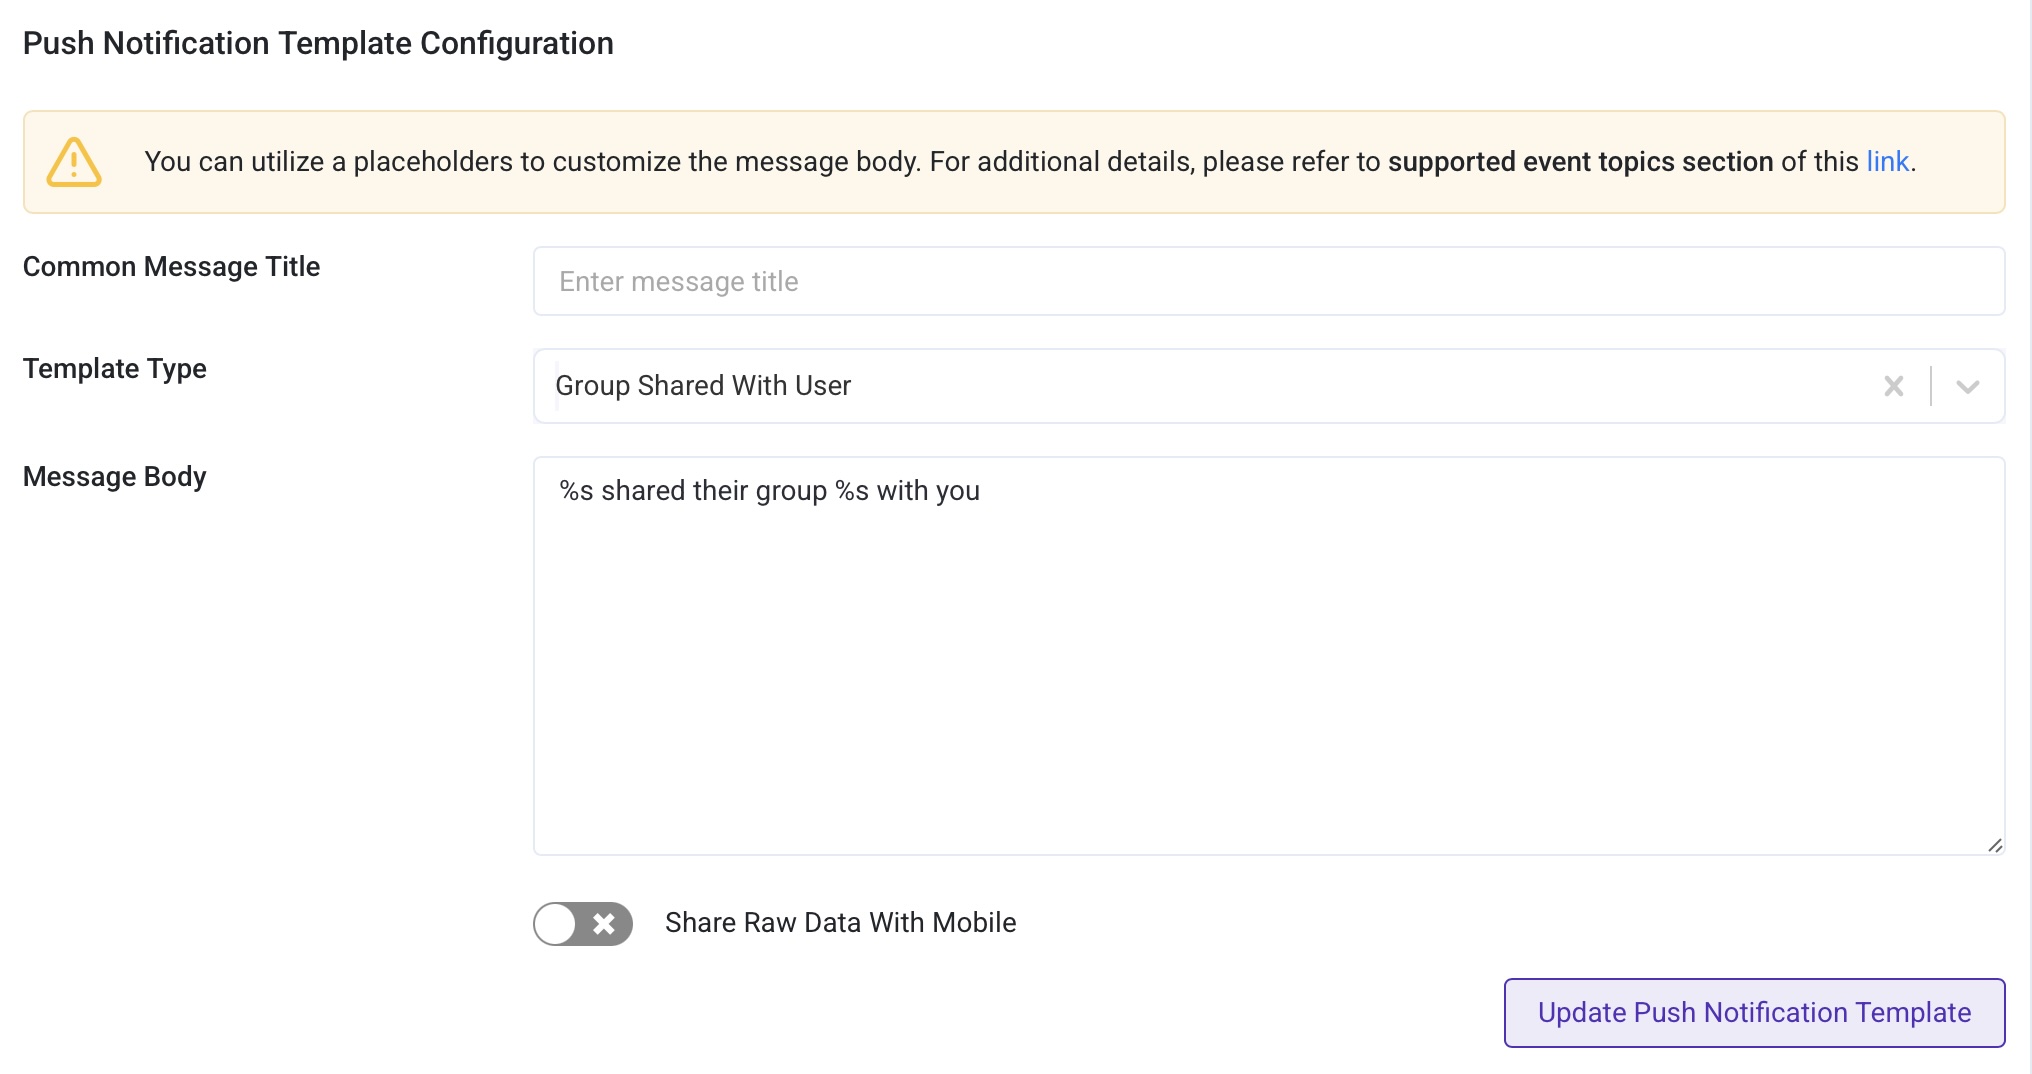
- Save Your Changes – Click the “Update Push Notification Template” button to apply your new settings.
- Verify the Configuration – Confirm that the updated template appears correctly on the dashboard and that notifications are functioning as intended.
You can refer this for how to create placeholders in event templates.
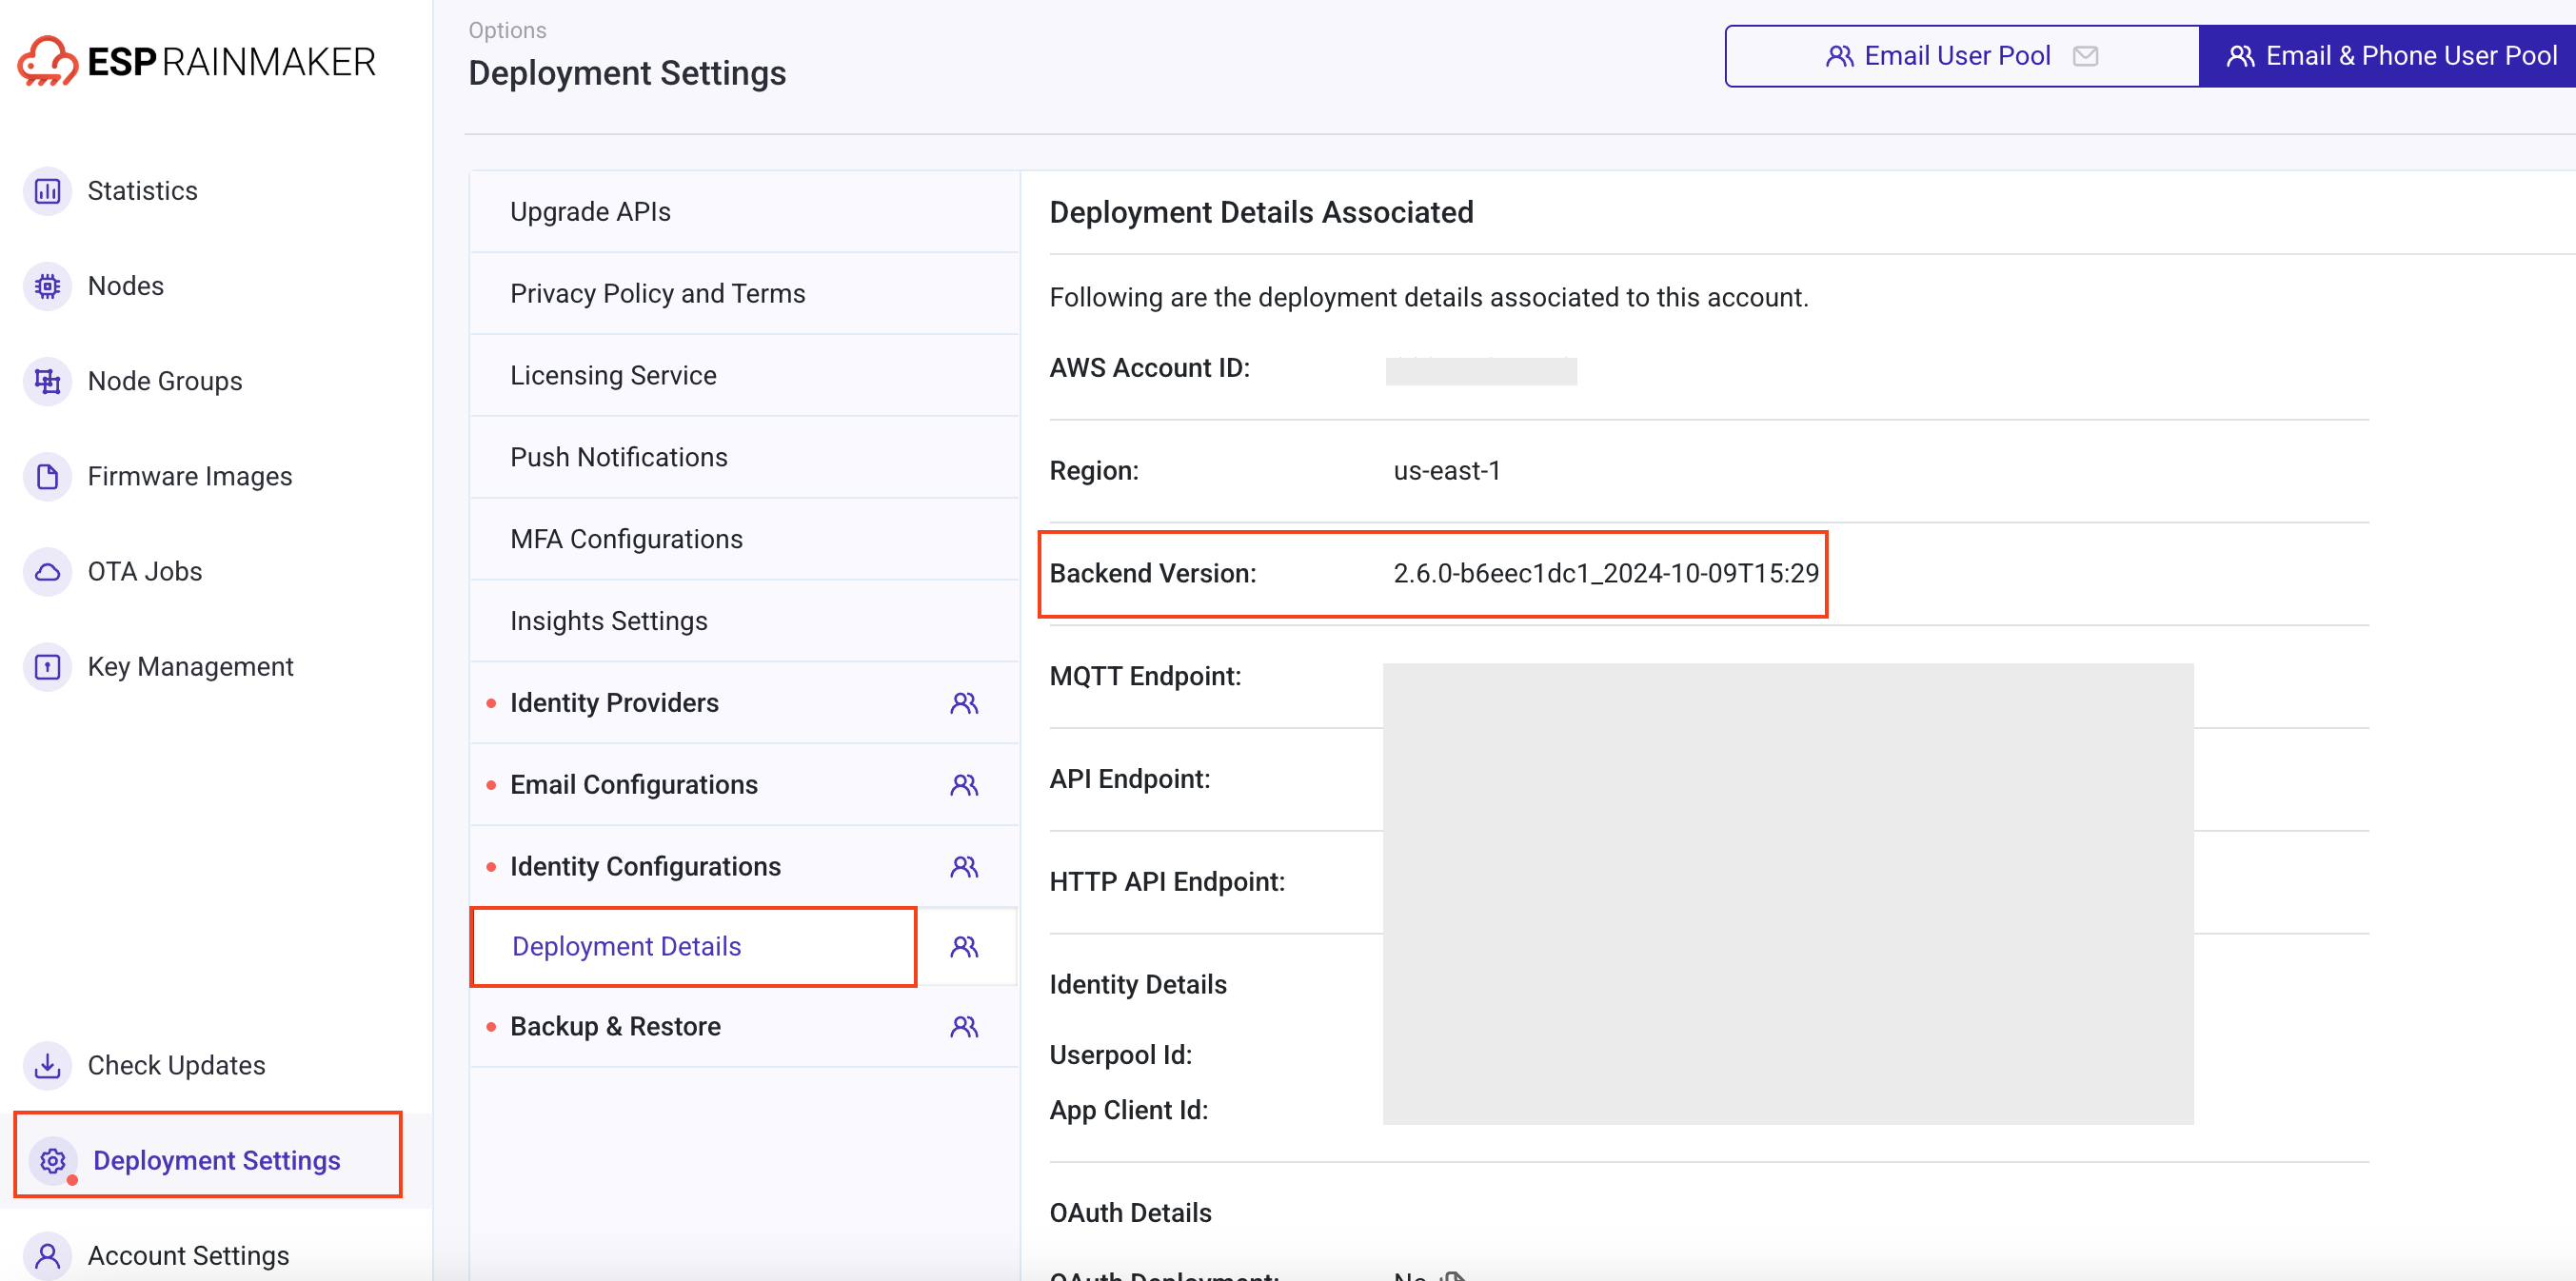
Where to check the current rainmaker backend & frontend version?
To check the RainMaker backend version follow the below steps.
- Login to RainMaker Dashboard using superadmin credentials.
- CLick on Deployment Settings option.
- Select Deployment Details option.
- Here you can see the current rainmaker backend version.
You can check the RainMaker frontend version at the bottom of the RainMaker Dashborad.
